If you’ve got a pile of scrap wood leaning in a corner, you’re sitting on some seriously good wall art potential. I’ve decorated more tiny apartments than I can count with off-cuts and leftovers, and these ideas always make a small space feel warmer and more custom.
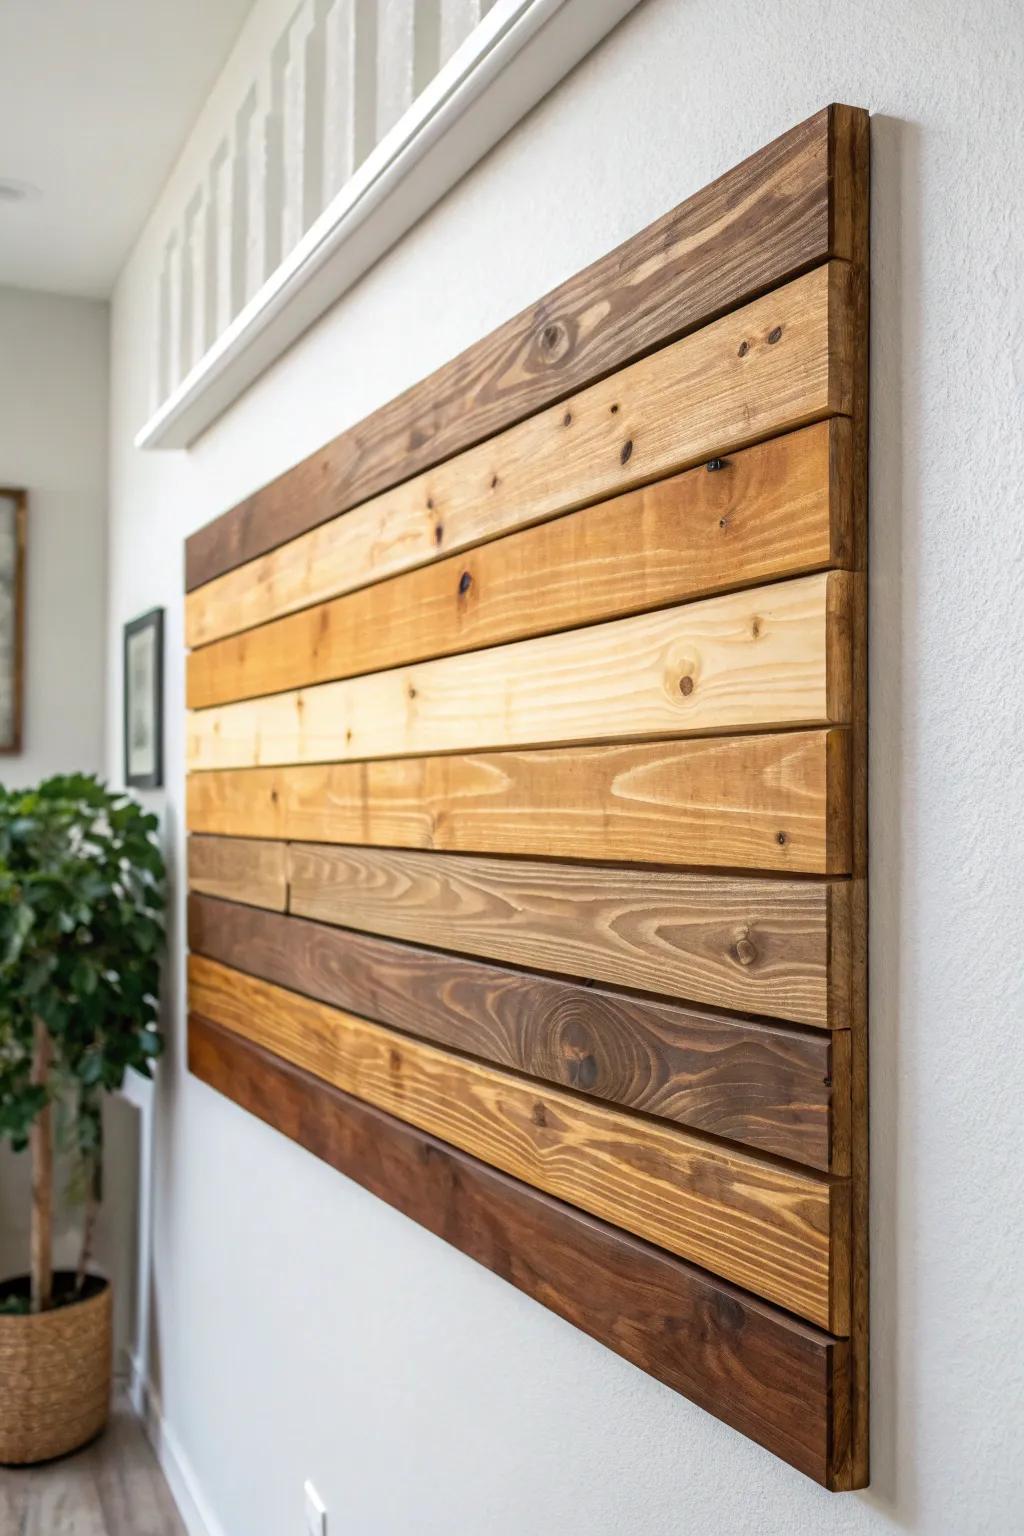
Rustic Plank Patchwork
I like to line up mixed-width scrap wood planks in a simple rectangle, letting the dings and nail holes become the whole vibe. In my 450 sq ft place, this kind of rustic wall art filled a big blank wall without adding visual clutter.
Possibly handy products:
- Reclaimed Wood Plank Bundles: Start your project easily with real barn wood bundles to achieve that authentic, textured rustic look quickly.
- Heavy Duty Wood Glue: Ensure your planks stay securely in place by applying this strong adhesive designed for uneven wood surfaces.
- Matte Wood Varnish: Protect your finished art piece while keeping the natural, raw appearance of the wood with a matte finish.

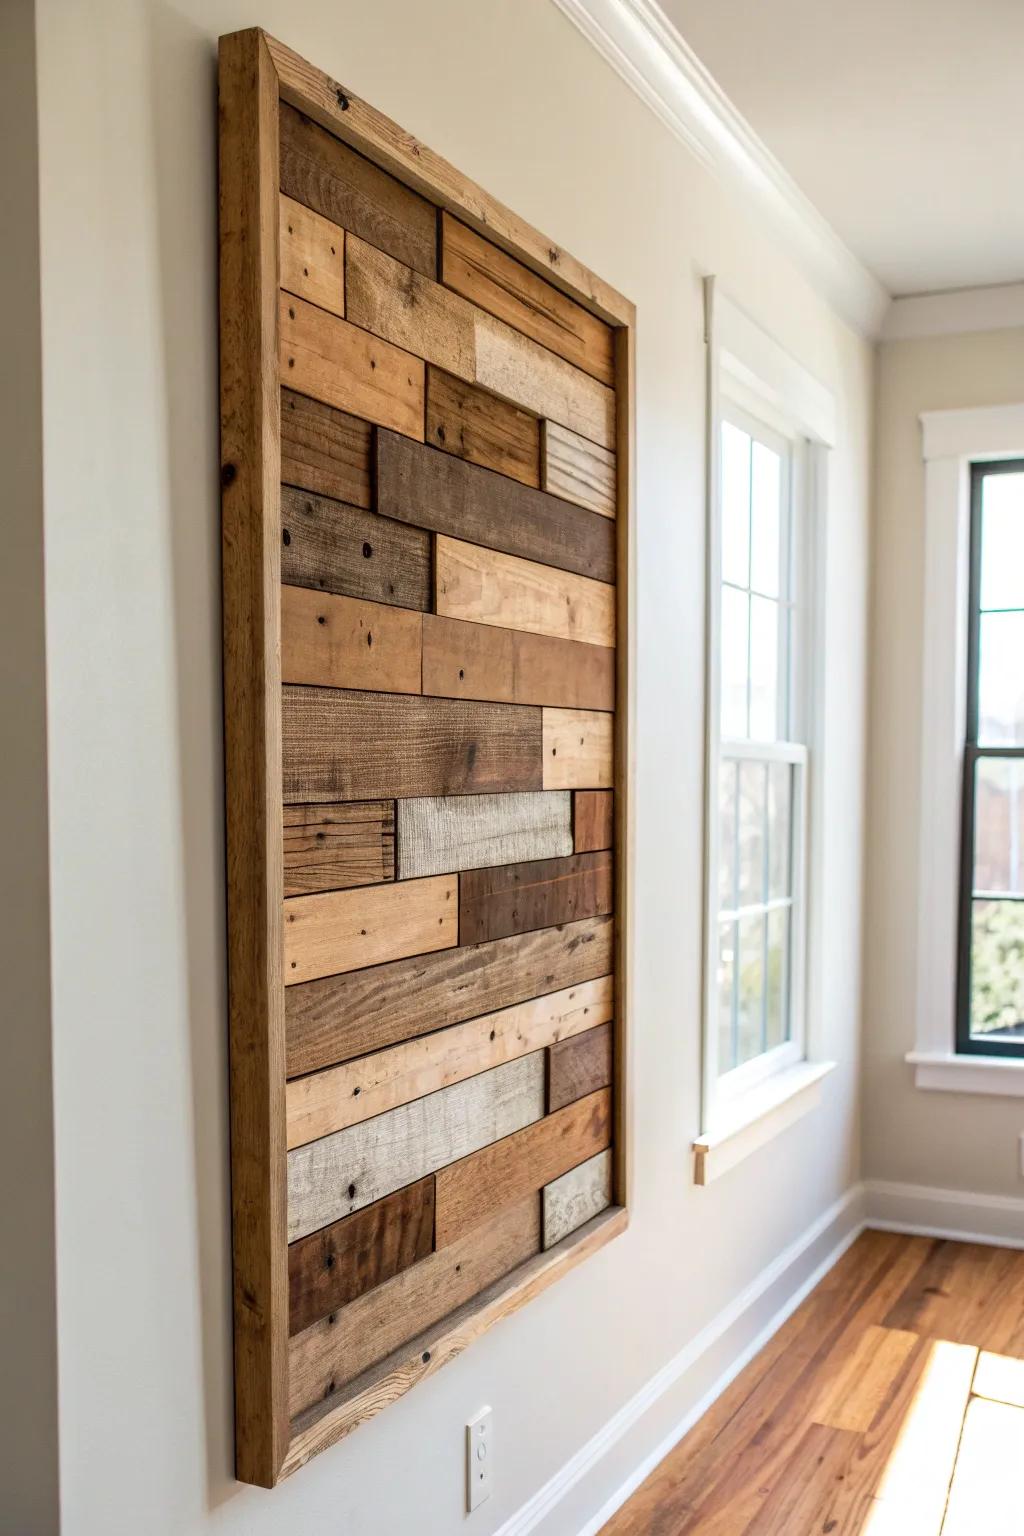
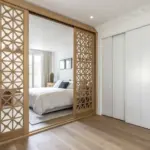
Simple Framed Scrap Wood Panel
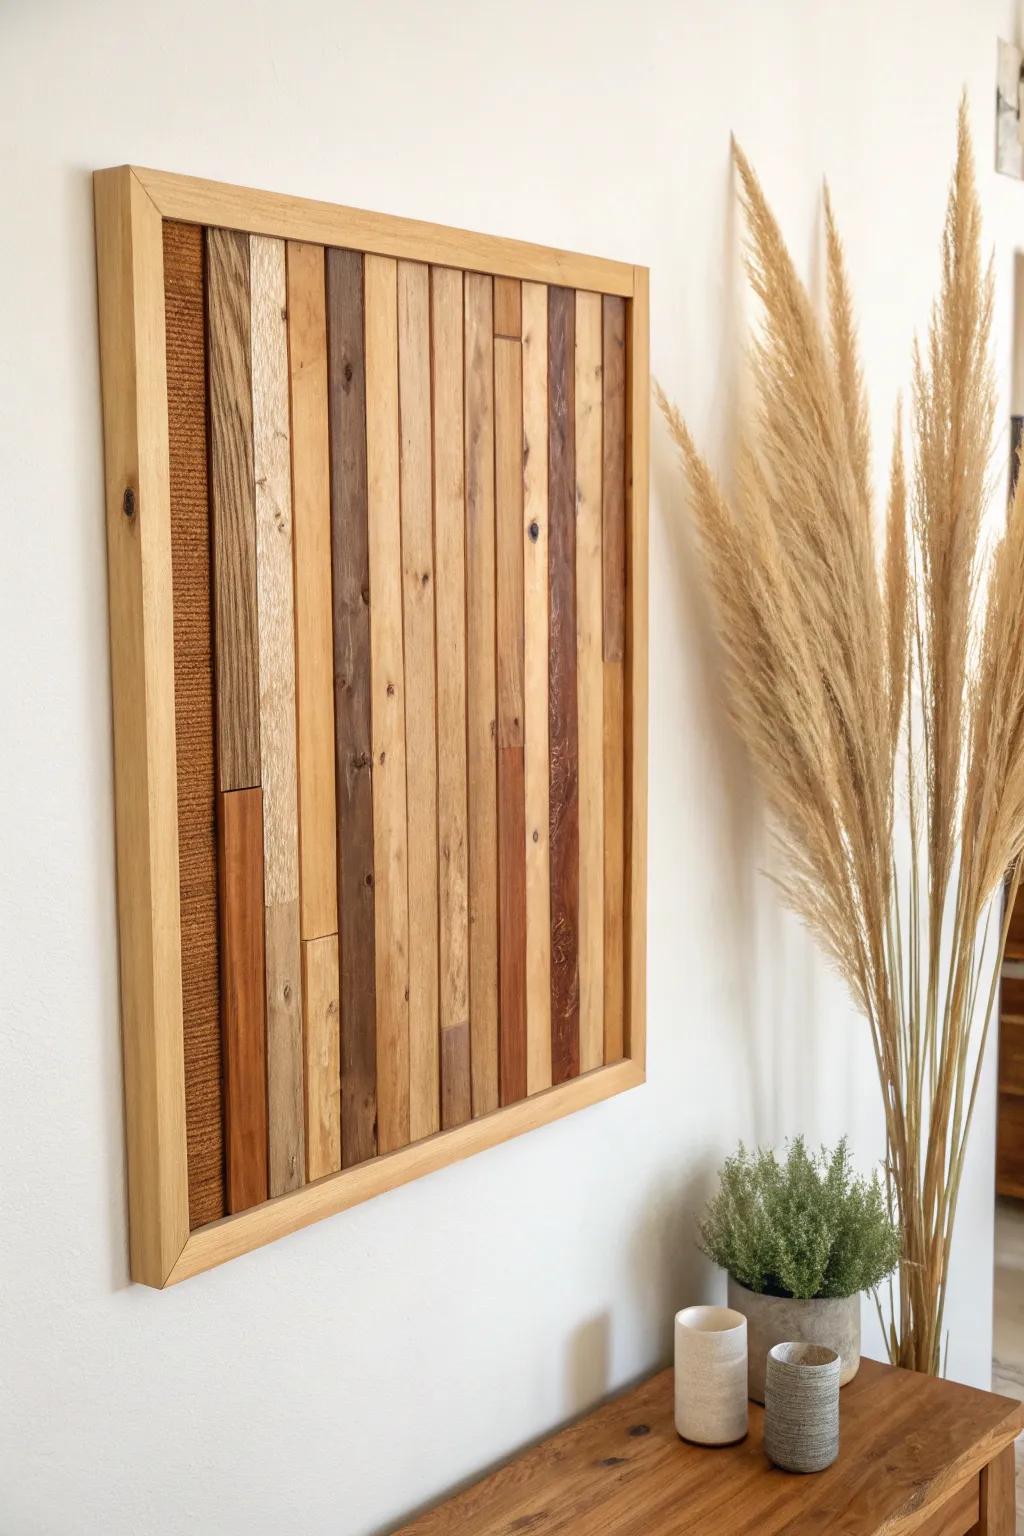
When I want something clean and finished, I frame a tight grid of scrap wood strips with a slightly thicker border. I’ve used this trick in rentals because it reads like “real art” but costs basically nothing.
A few suggestions:
- Wood Glue: Secure your scrap strips firmly to the backing board for a durable and long-lasting arrangement.
- Plywood Backing Sheet: Provide a sturdy foundation for your wood strips with a thin, flat base layer sheet.
- Miter Saw Box: Ensure your frame corners are perfectly angled and professional-looking with this simple manual culting tool.
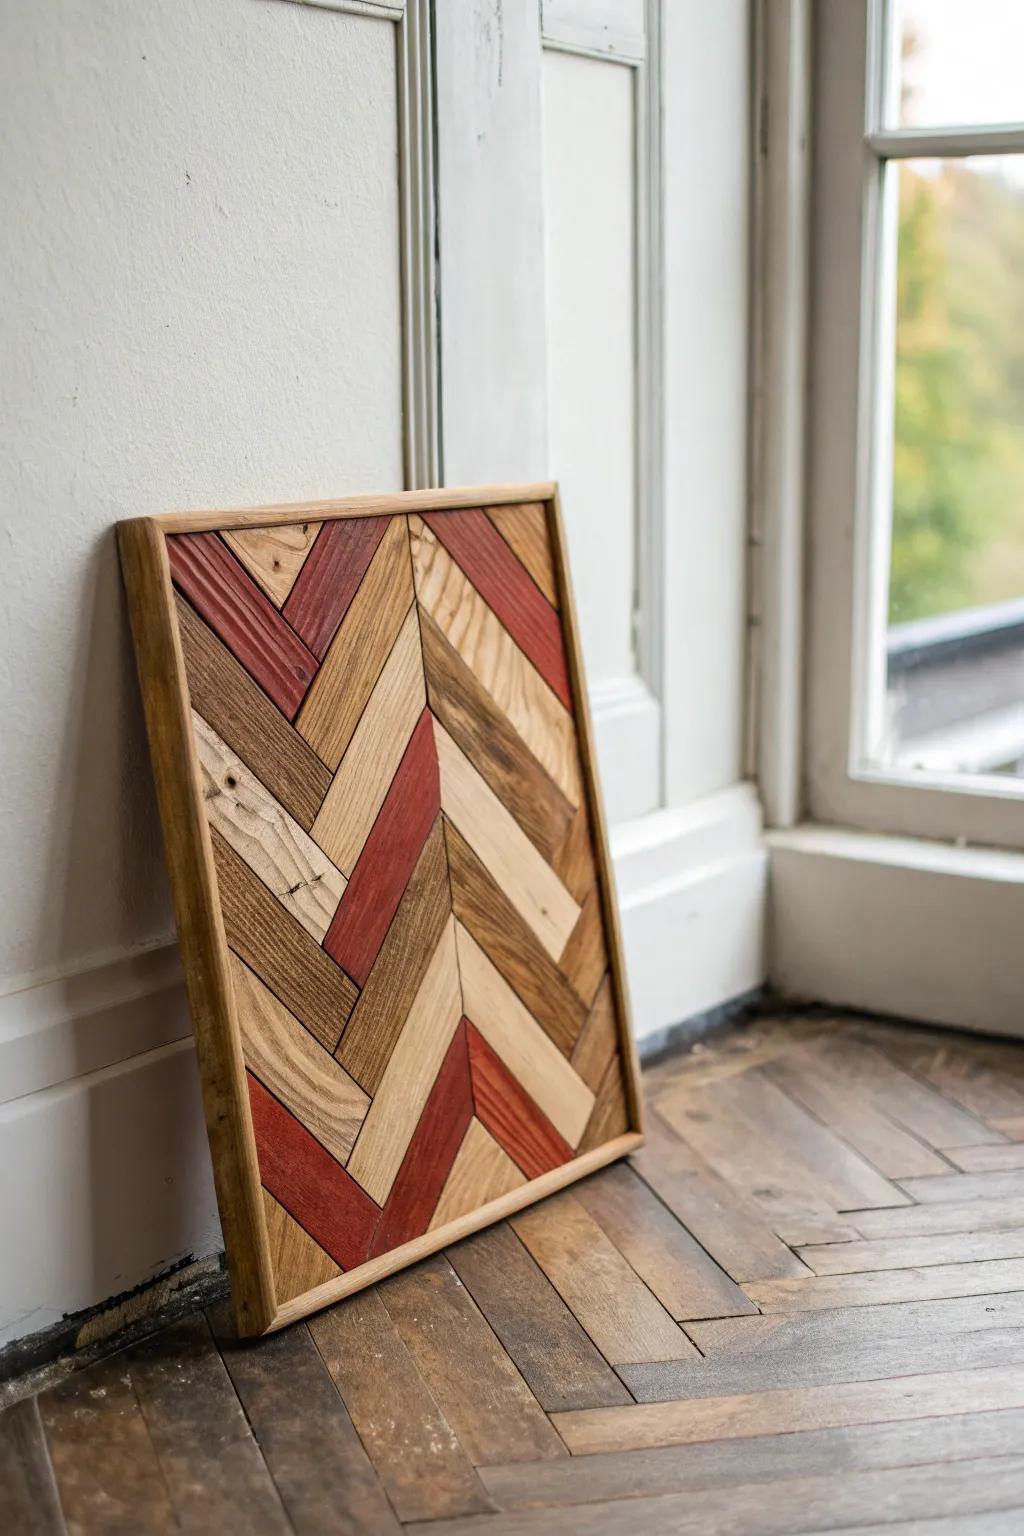
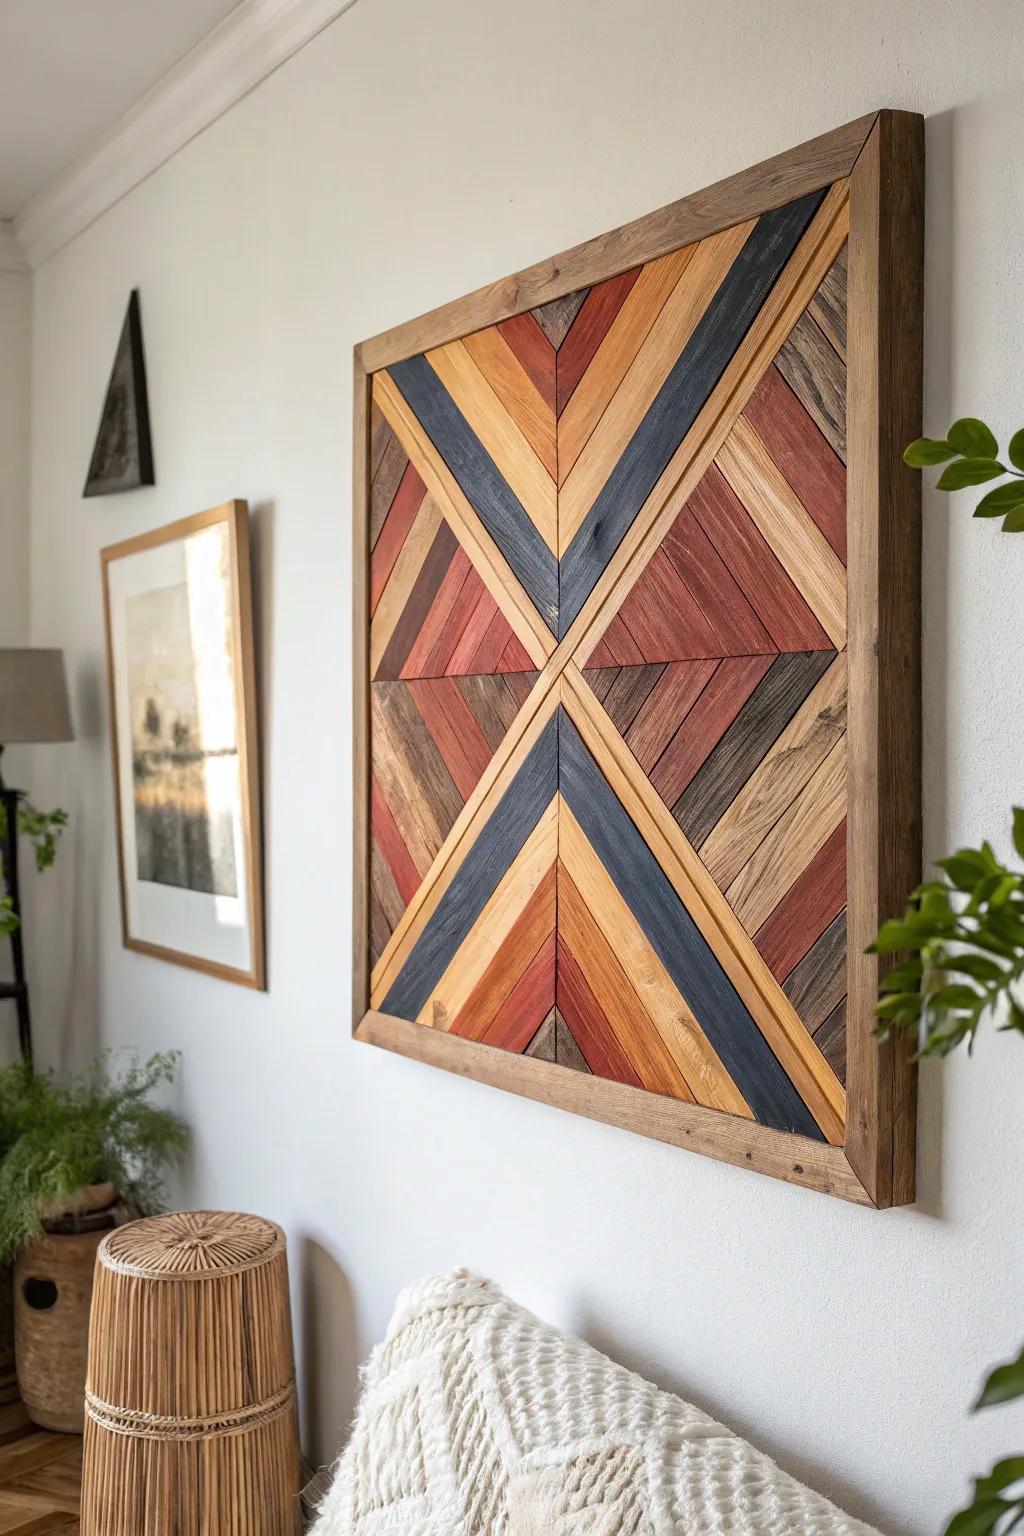
Chevron Statement Board
A classic chevron pattern made from short off-cuts always looks high-end, even if the cuts aren’t perfect. I’ve hung one above a tiny sofa, and the zigzag movement instantly made the whole wall feel taller.
Possibly helpful picks:
- Miter Saw or Miter Box: Achieve precise angled cuts essential for creating clean chevron patterns on your wood pieces quickly and easily.
- Wood Stain Variety Pack: Enhance the natural grain and create contrast between your wood slats by experimenting with different stain colors.
- Heavy Duty Wood Glue: Secure your wood slats firmly to the backing board for a durable and long-lasting wall art piece.

Herringbone Mini Panel
For smaller spaces, I build a compact herringbone wall art panel so it doesn’t overpower the room. I’ve styled mine above a narrow console, and it gave that entryway “done” feeling in one move.
Maybe worth checking out:
- Wood Wood Design Stencils: Create precise herringbone layouts easily with reusable stencils that guide your cuts and pattern arrangement.
- Assorted Wood Stain Samplers: Achieve the multi-colored look by applying various stain shades to individual wood pieces before assembling.
- Strong Wood Bonding Glue: Secure your scrap pieces firmly to the backing board for a durable and long-lasting art piece.
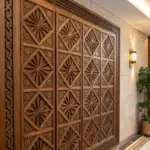
3D Geometric Block Mosaic
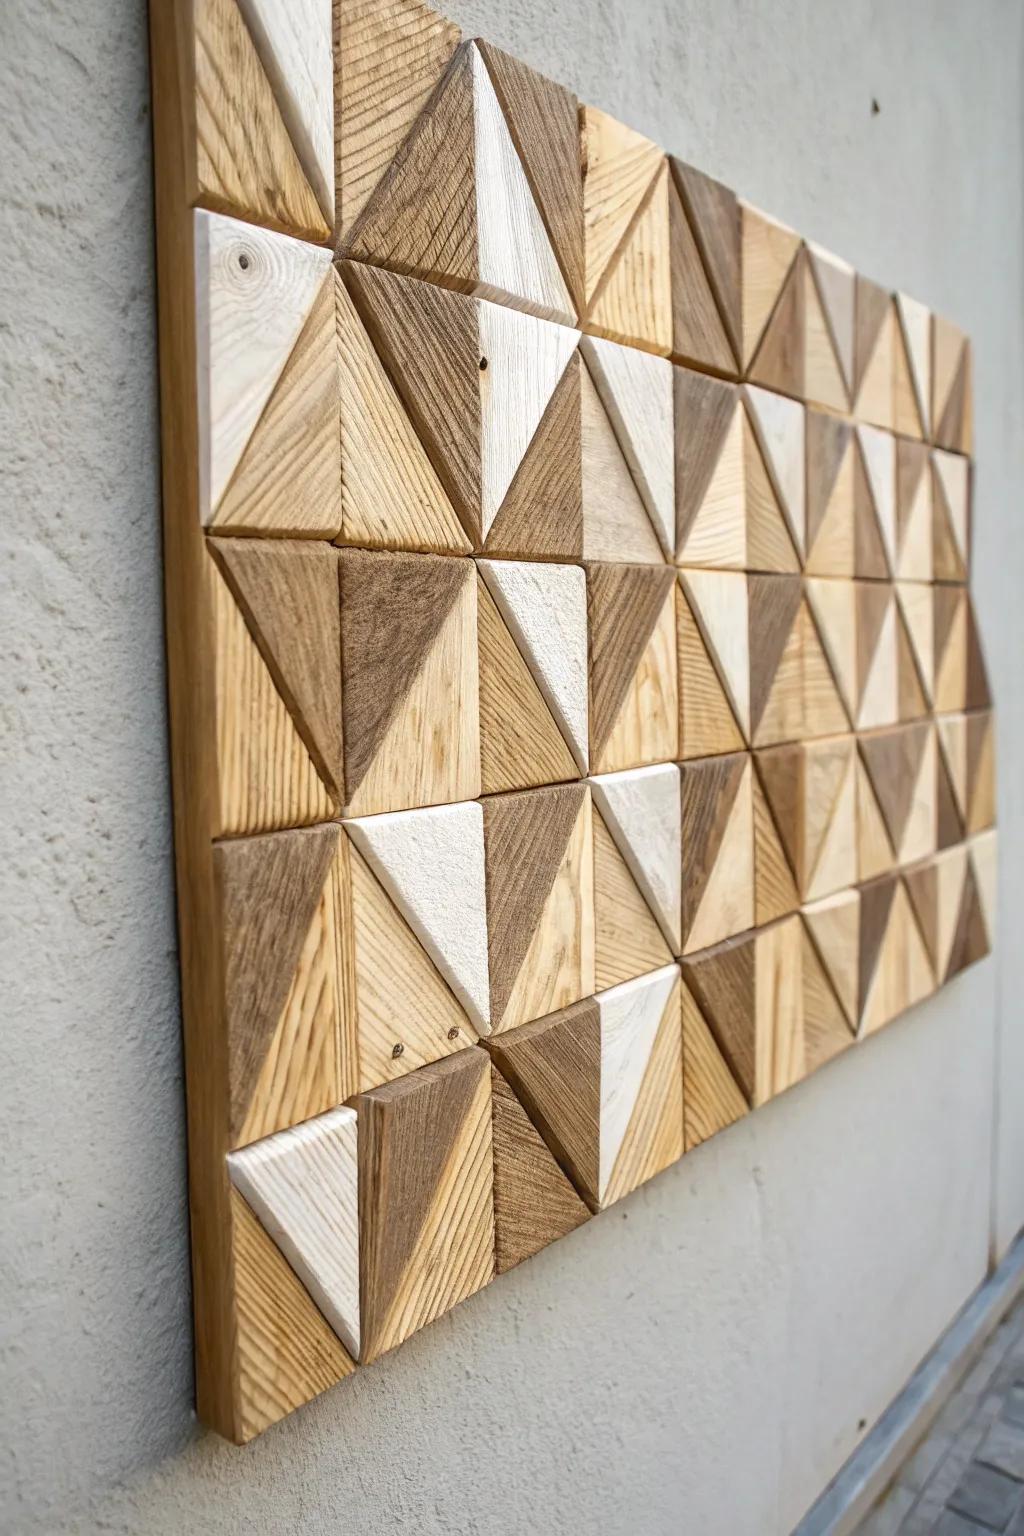
Gluing little chunky off-cuts into a raised 3D geometric mosaic is my go-to when I want texture without adding shelves. I’ve done this in a studio apartment, and the shadows make it look different all day long.
Check these products out:
- Heavy-Duty Construction Adhesive: Ensure your chunky wood blocks stay securely attached to the backing board with this strong, permanent bonding adhesive.
- Adjustable Miter Box and Saw: Cut your scrap wood into perfect, consistent geometric angles like triangles or diamonds with this manual cutting tool.
- Assorted Wood Stain Sampler Pack: Create depth and contrast in your mosaic by applying different varied shades to individual blocks before gluing them.
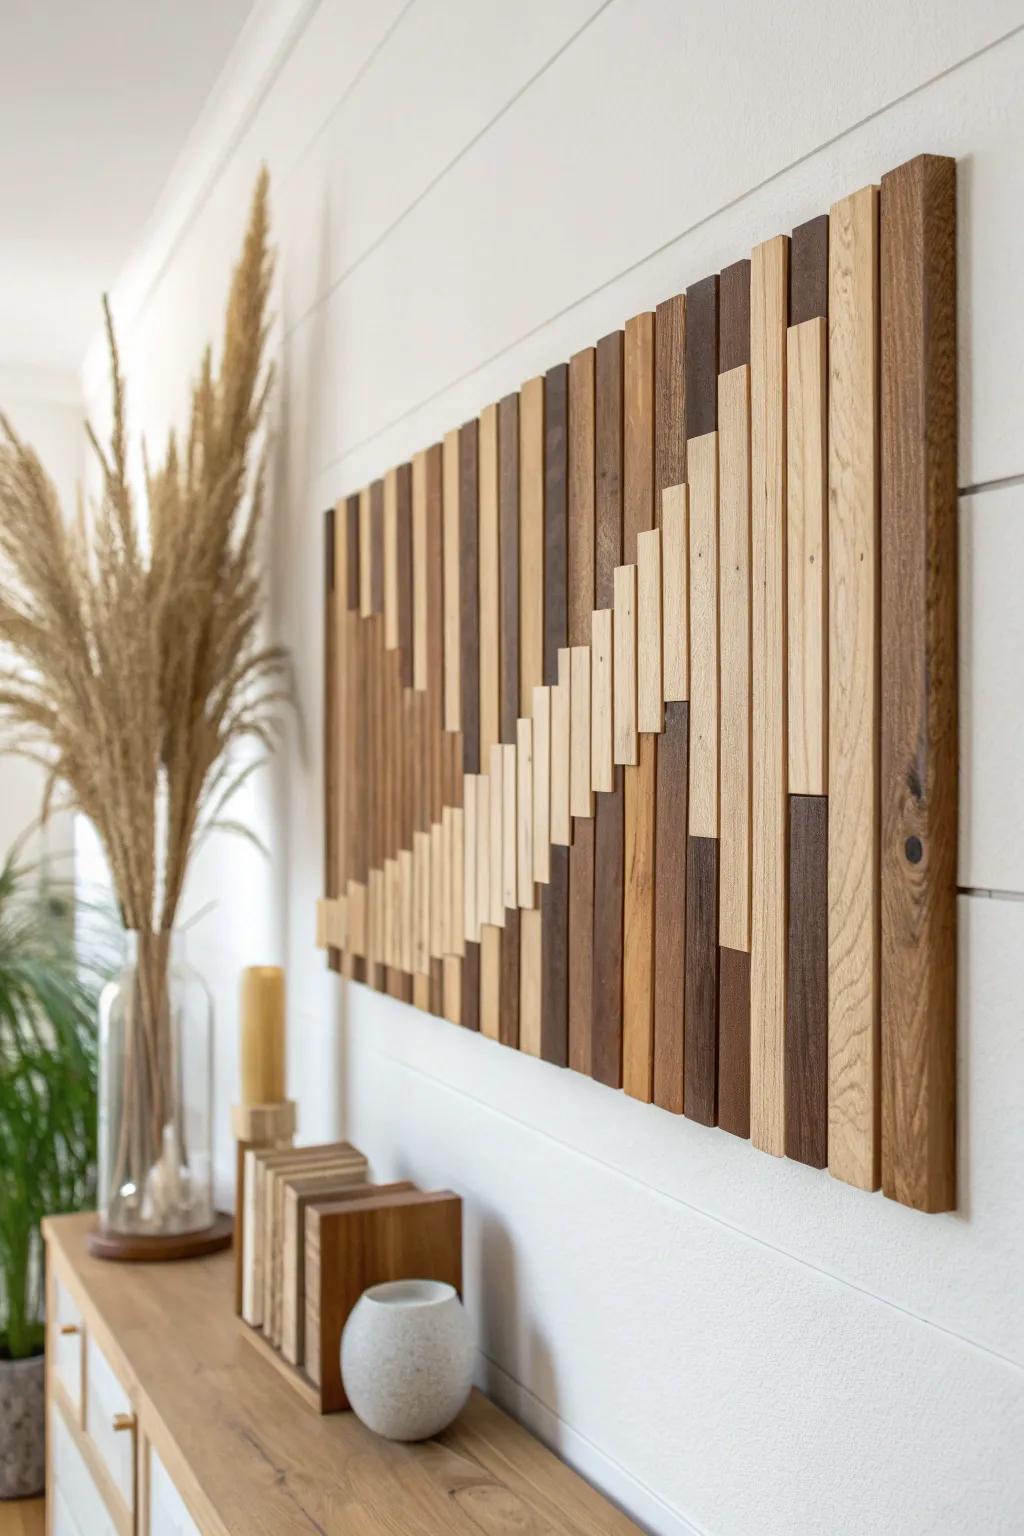
Abstract Horizon Strip Art
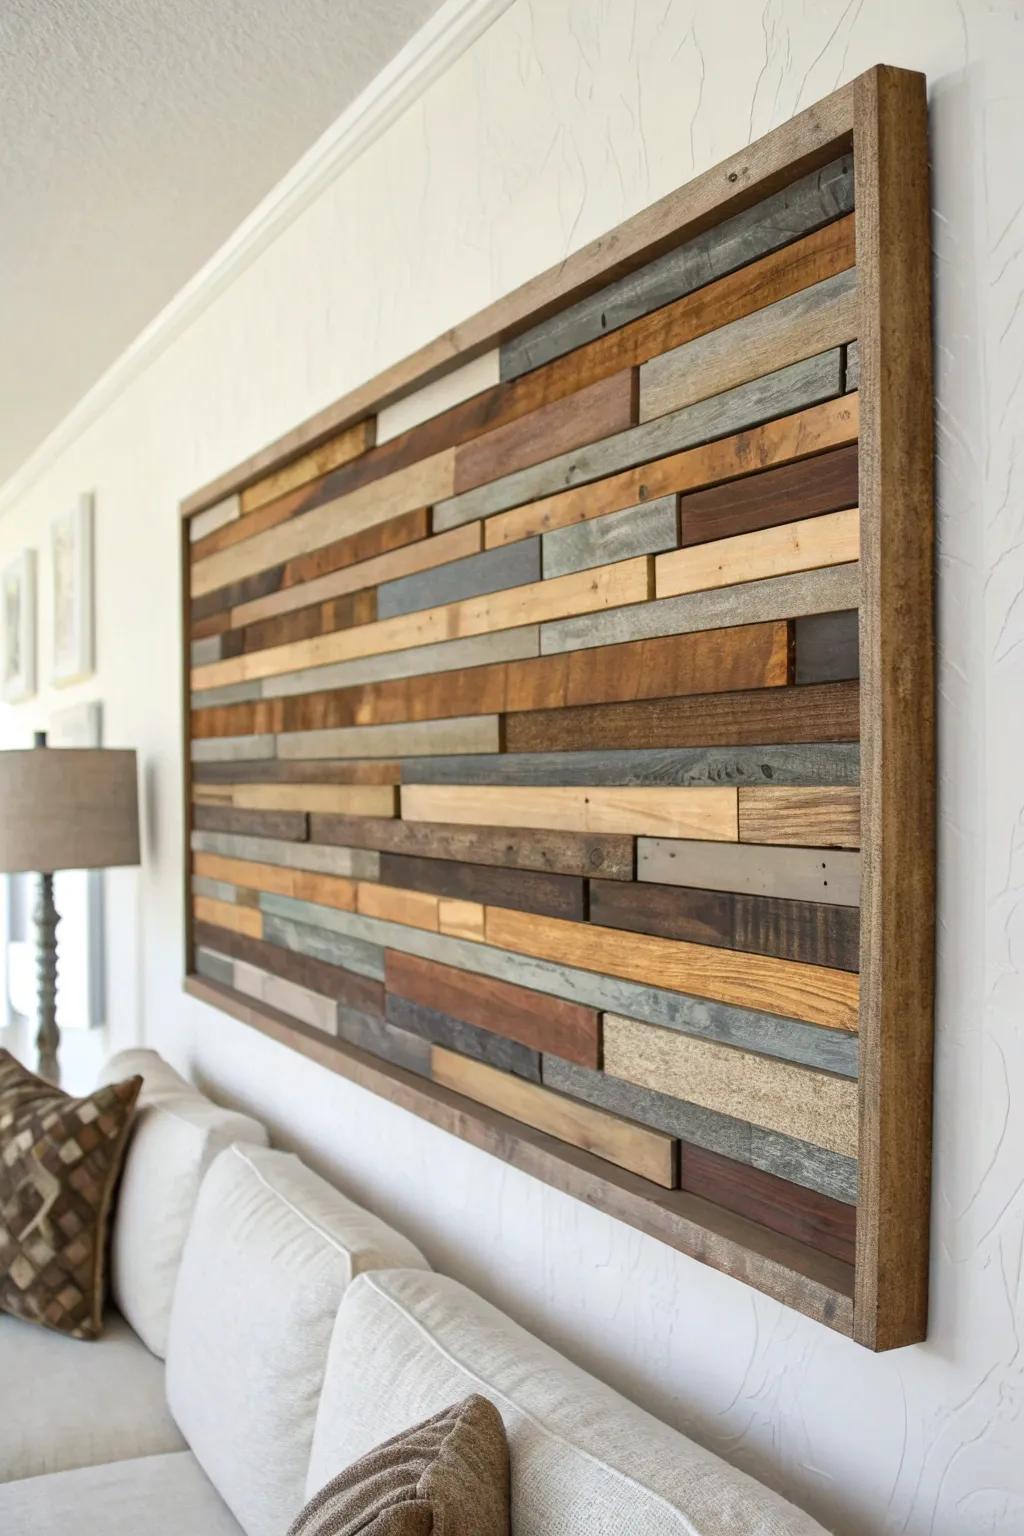
I layer long and short scrap wood strips in staggered rows to create an abstract landscape vibe. This one saved me in a bland living room because it adds drama while still feeling calm.
Products that could assist:
- Assorted Wood Stain Sampler Pack: Create depth and contrast in your art piece by staining different strips in varied shades for richness.
- Wood Glue and Clamp Set: Ensure your custom frame and strips stay securely bonded together while you assemble your unique masterpiece.
- Reclaimed Wood Plank Bundle: Supplement your scrap collection with weathered barn wood bundles to add authentic texture and instant character.
Ombre Stain Gradient Slats
I use whatever stains or diluted paint I already have to fade boards from light to dark for an ombre wall art look. It’s one of my favorite ways to make mismatched scrap wood look intentional.
Some ideas to consider:
- Wood Stain Variety Pack: Explore multiple shades to create the perfect gradient effect on your wood slats with this versatile stain kit.
- Foam Applicator Brushes: Apply stain smoothly and evenly across your scrap wood pieces with these disposable foam brushes essential for crafting.
- Heavy Duty Construction Adhesive: Secure your finished ombre slats firmly to the backing or wall with this strong, reliable mounting adhesive.
Diamond Trio Wall Set
Cutting backing boards into diamonds and filling them with angled scrap wood pieces makes a fun little set you can cluster. I’ve used three of these to balance out a small wall where one big piece felt too heavy.
Useful items to consider:
- Wood Stain Variety Pack: Add depth to your design by using different stain colors to create striking contrast between geometric sections.
- Miter Saw or Miter Box: Ensure your angled cuts are precise and tight-fitting for professional-looking geometric patterns and clean corners.
- Heavy-Duty Wood Glue: Secure your scrap pieces firmly to the backing board for a long-lasting and durable art piece.
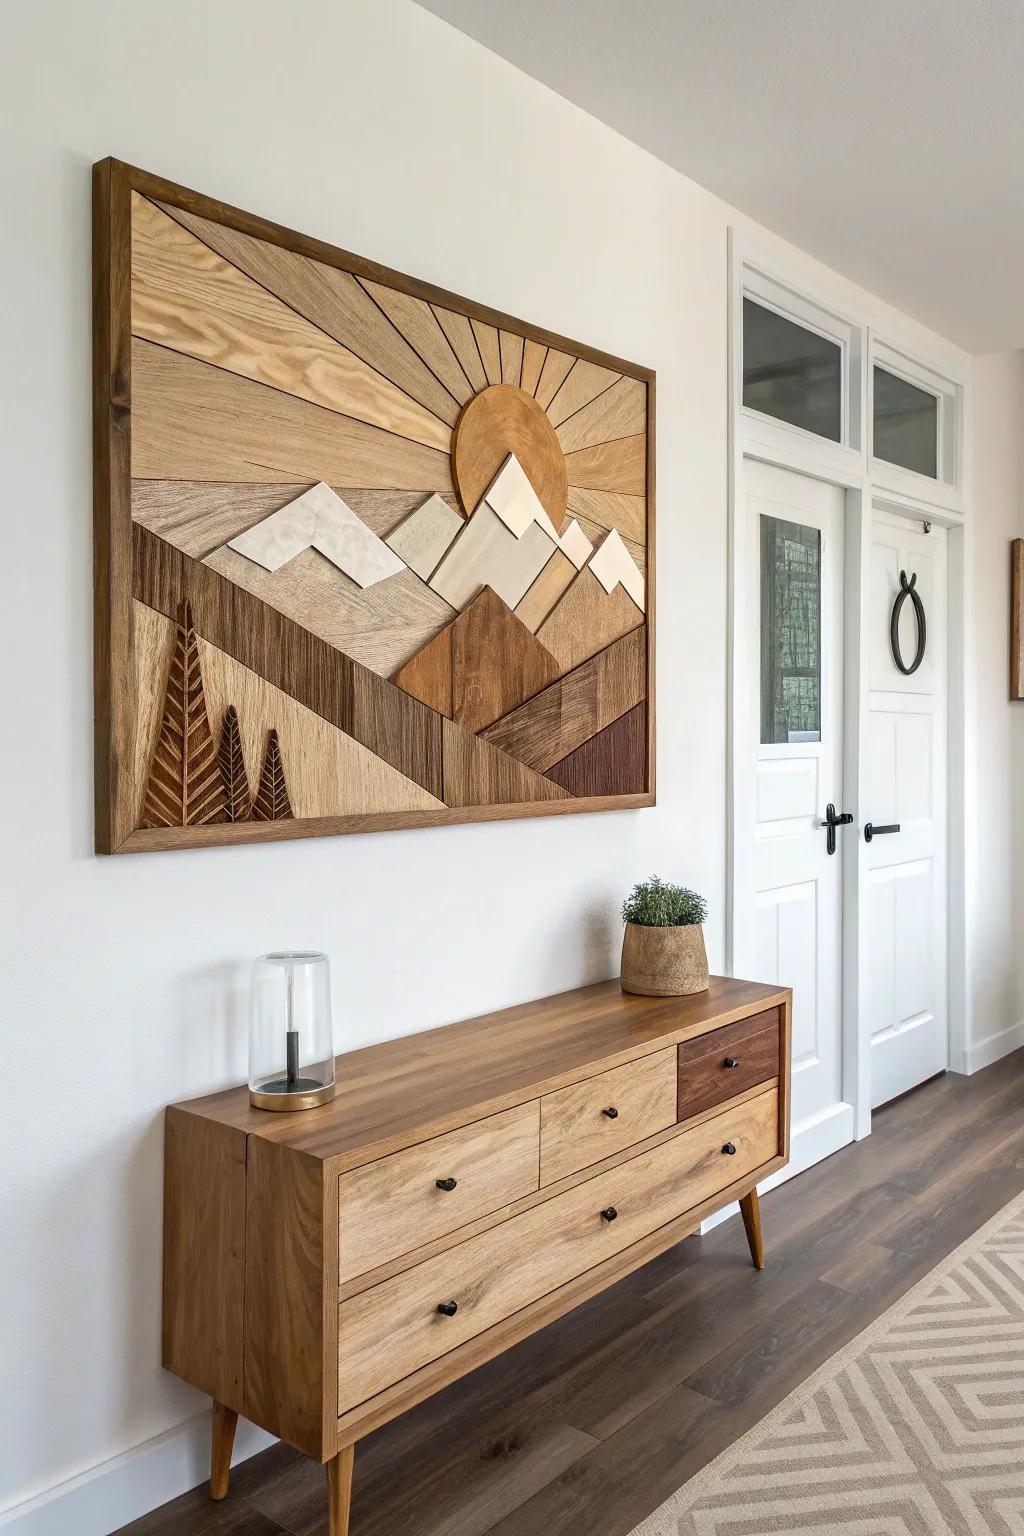
Mountain Range Scrap Wood Art
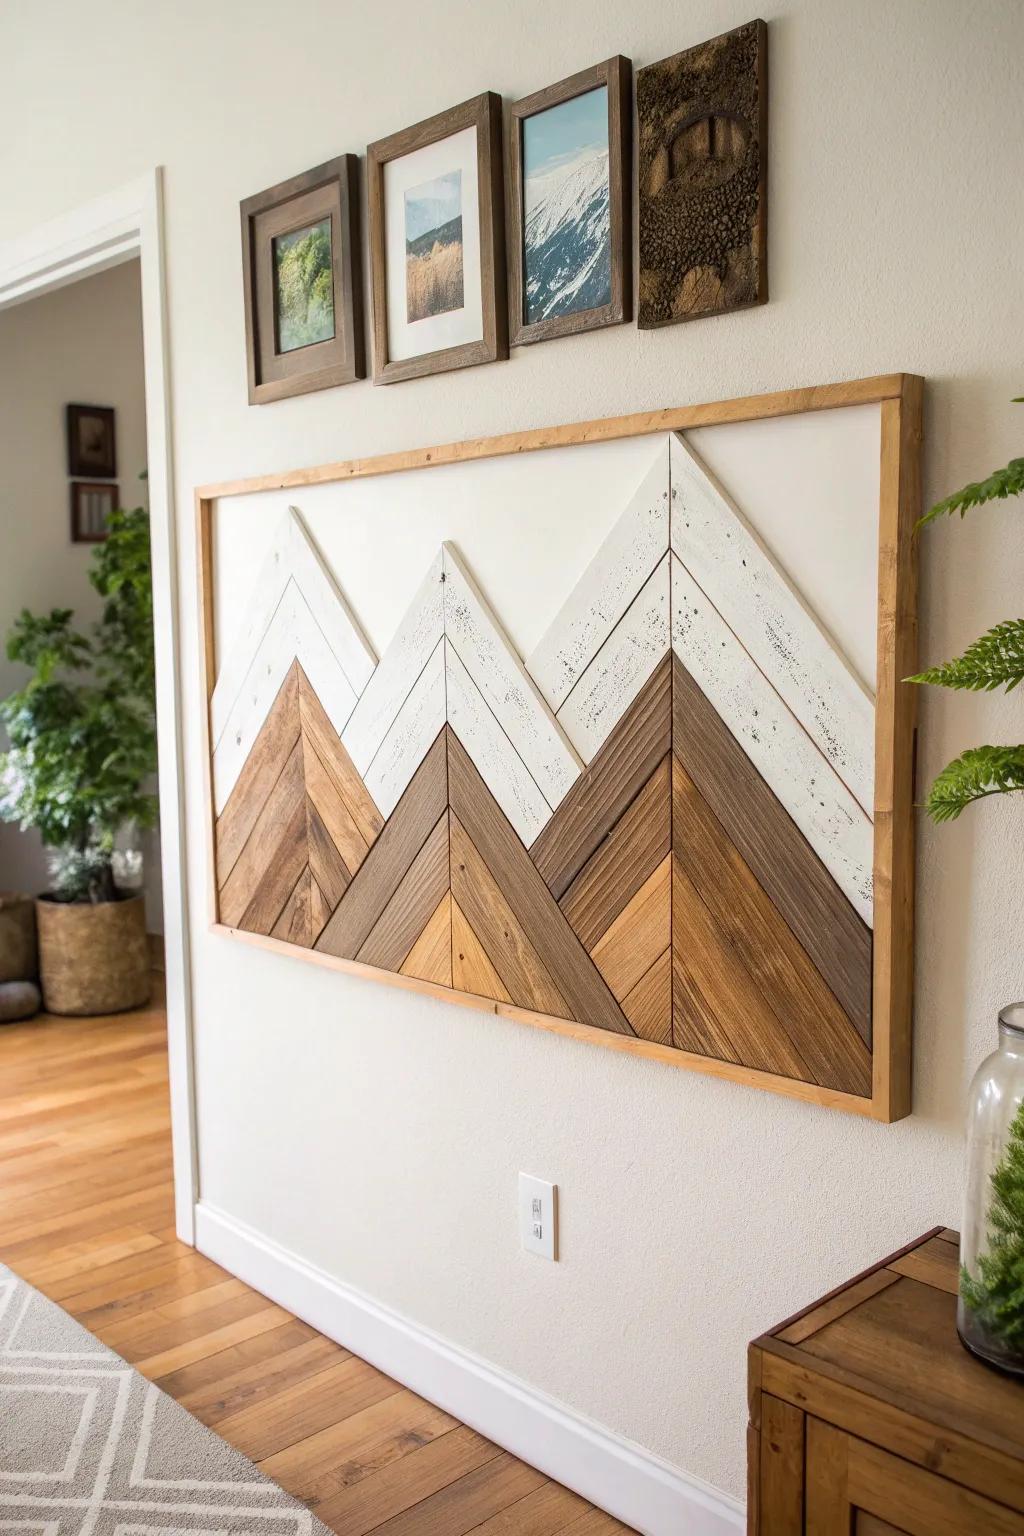
I’ve made a simple mountain silhouette by cutting triangles from off-cuts and lining them up like a range. In a compact bedroom, it gave me that cozy cabin feel without needing any extra decor.
Some handy options:
- Wood Stain Variety Pack: Achieve that multi-toned mountain look by staining your scrap wood pieces in various natural shades before assembly.
- Miter Box and Saw Set: Ensure your mountain peaks have crisp, perfect angles by using a manual miter saw for precise cuts.
- White Chalk Style Paint: Create snowy mountain caps easily by distressing the upper wood sections with a matte white chalk paint.
Wood Slice Tree Canopy
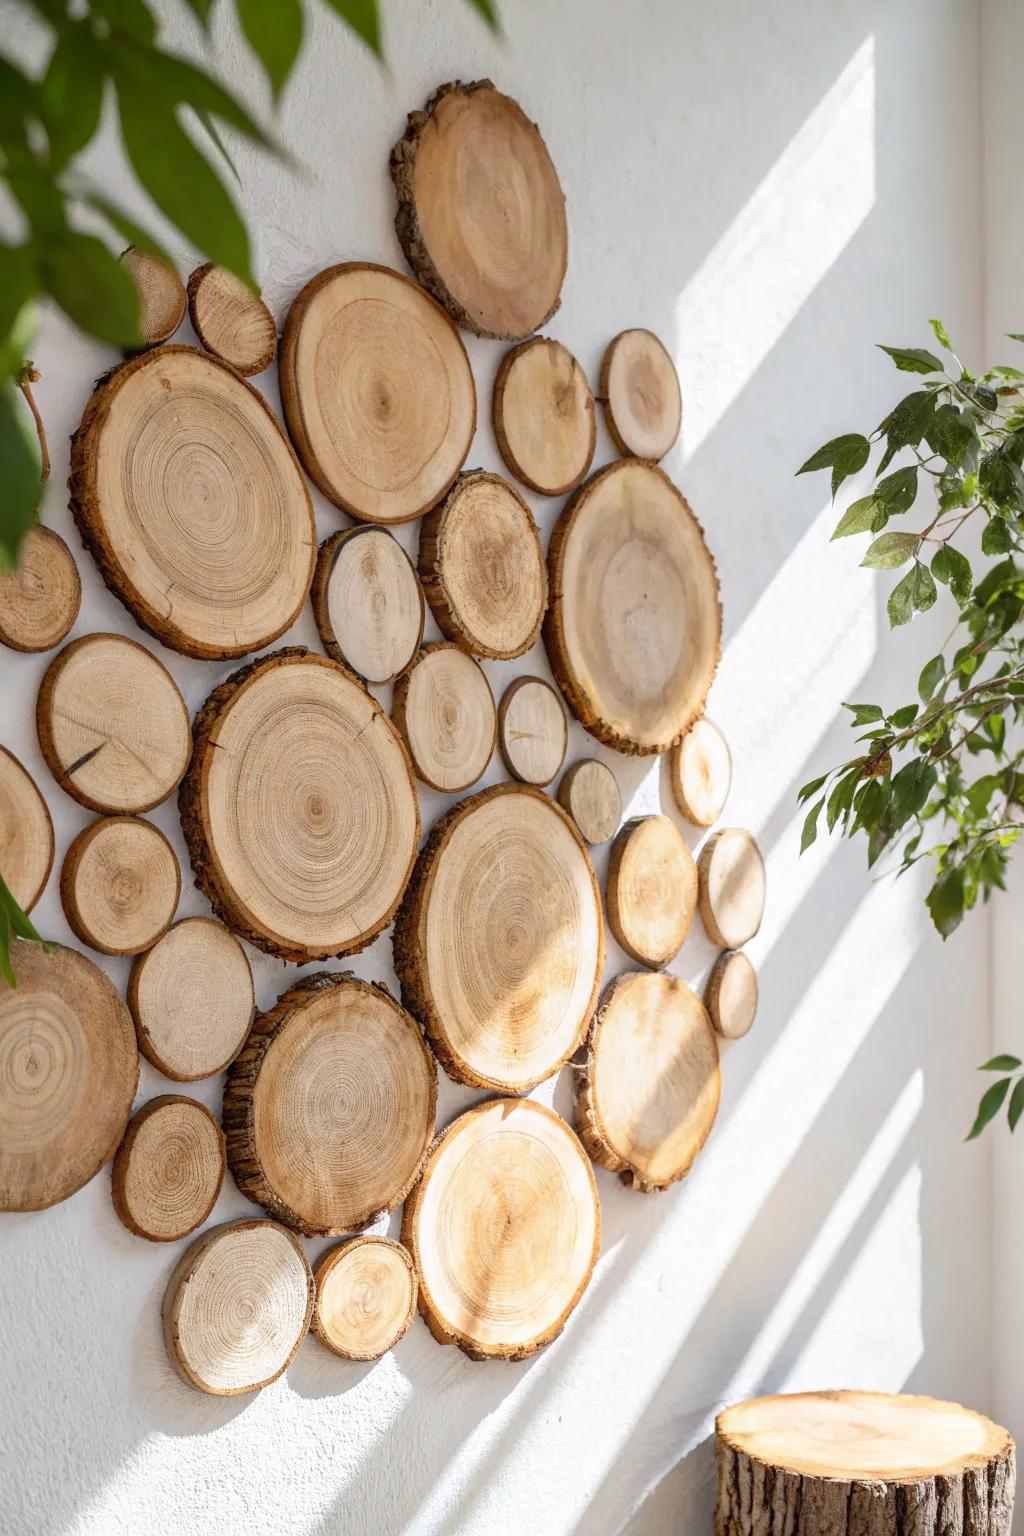
If you’ve got branch cutoffs, I love turning them into wood slice wall art arranged like a tree canopy. I tried this above a reading chair, and the round shapes softened all the straight lines in my tiny space.
Try these:
- Pre-Sanded Natural Wood Slices: Start your art project easily by grabbing packs of pre-dried wood slices in assorted sizes for variety.
- Heavy-Duty Construction Adhesive: Secure your wood pieces firmly to a backing board or wall using a strong, reliable construction adhesive.
- Matte Clear Wood Varnish: Protect the natural grain and prevent cracking by applying a coat of clear matte finish to each slice.
Simple Line Art Burned Into Scrap Wood
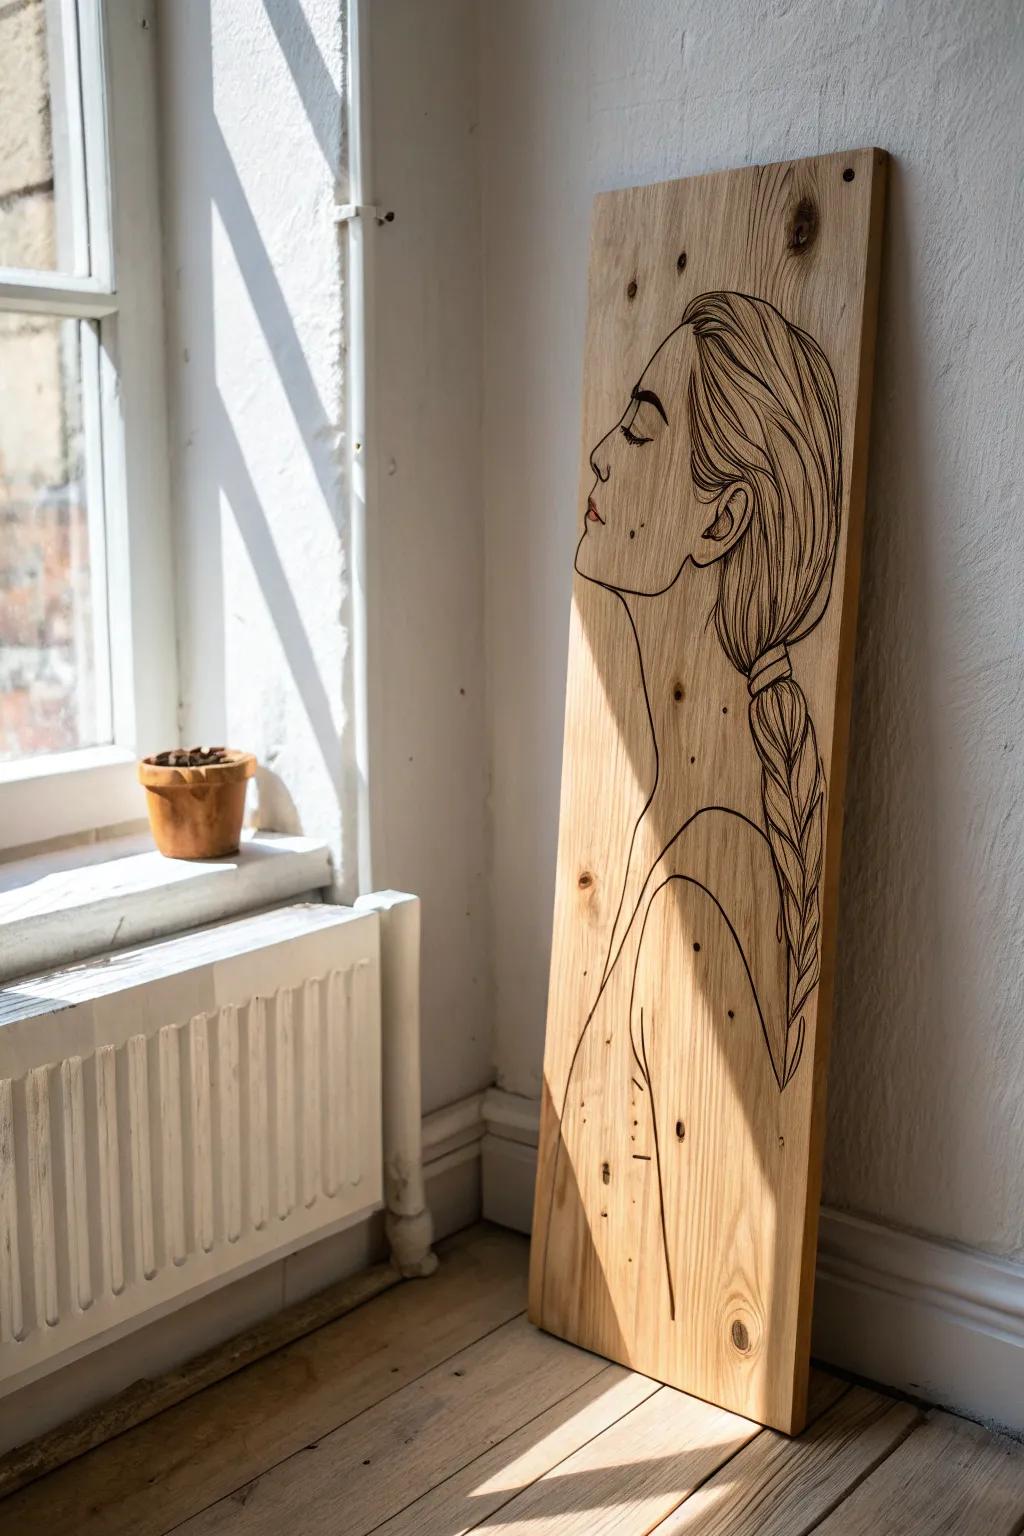
A quick burned-in line drawing (think face outline or single stem) turns plain scrap wood into modern wall art fast. I’ve done this on a skinny board for a hallway, and it looked like a gallery piece from a distance.
These products might be useful:
- Wood Burning Pyrography Kit: Create precise line drawings on timber easily with a versatile tool featuring adjustable temperature controls.
- Carbon Transfer Paper: Trace your favorite line art designs directly onto the wood surface before burning for perfect accuracy.
- Clear Matte Wood Finish: Protect your finished artwork and enhance the wood grain without adding unwanted shine or gloss.
Mini Ledge Built Into Wall Art
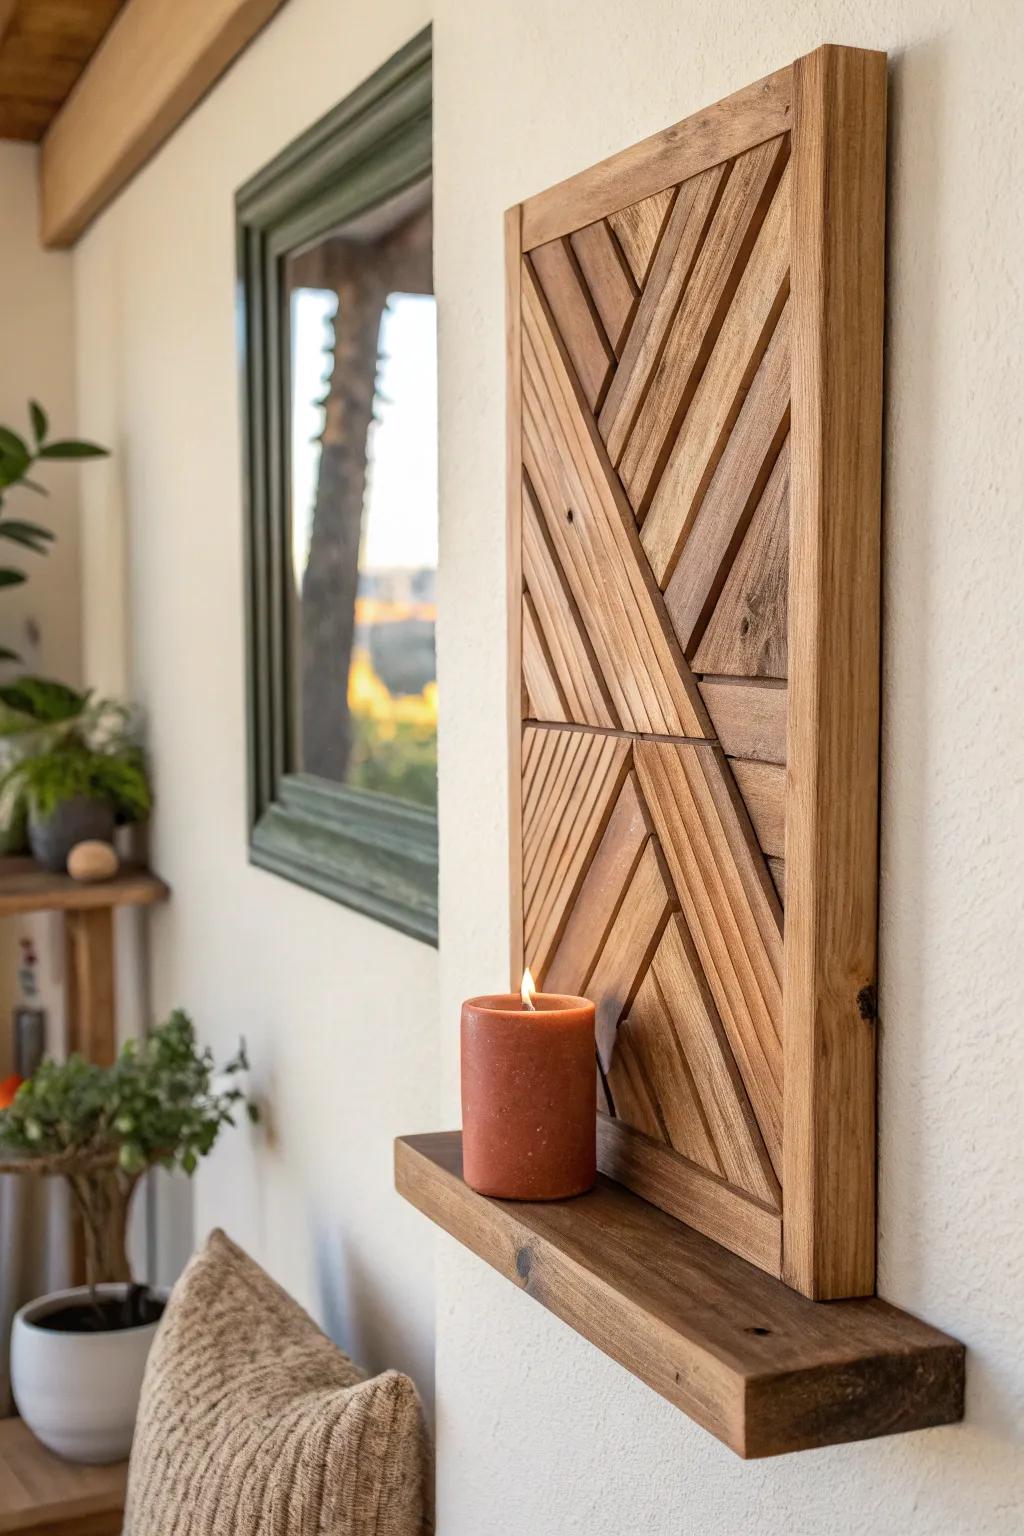
I attach a tiny floating ledge to the bottom of a scrap wood panel so the art can hold one candle or a small framed photo. In my apartment, that little “function + pretty” combo replaced the need for an extra side table.
These products might help:
- Pillar Candles: Add warmth and ambiance to your new shelf display with candles that fit perfectly on narrow ledges.
- Wood Glue or Construction Adhesive: Secure your scrap wood pieces and mini ledge firmly in place for a durable, long-lasting build.
- Wood Stain or Finish: Enhance the natural grain of your scrap wood and protect the surface with a rich, protective finish.
Interlocking Hexagon Tile Cluster
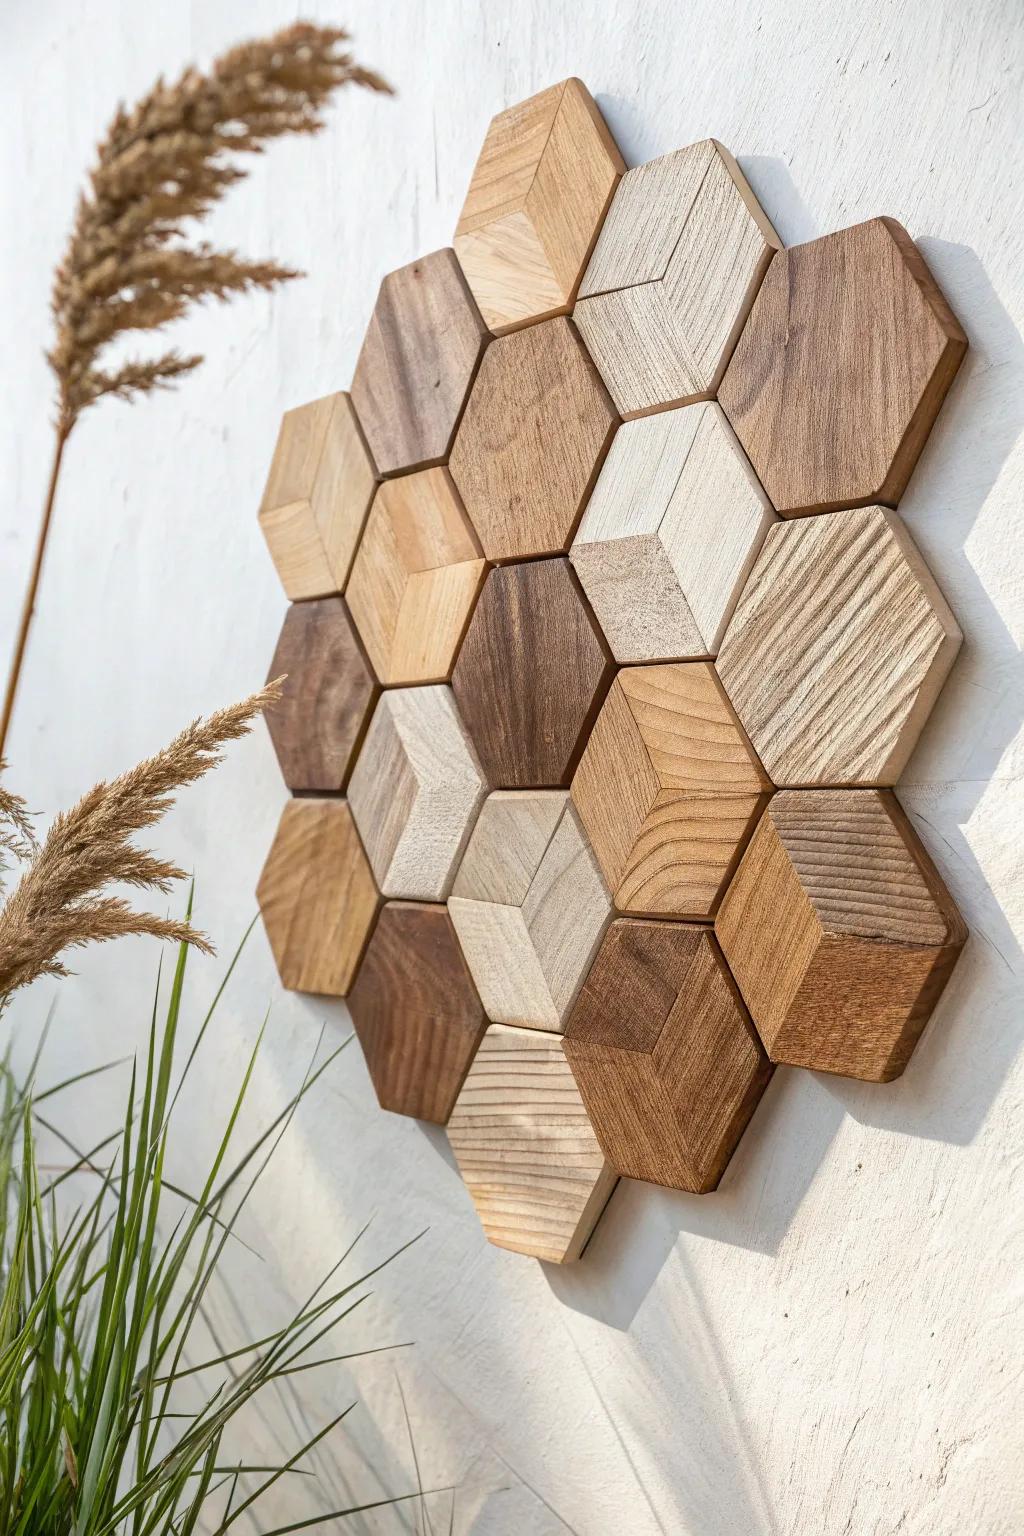
Hexagons made from short scrap wood pieces look super crisp when you hang them as a little cluster. I’ve used this on a narrow wall, and it gave me a bold shape moment without taking up floor space.
A few choices to try:
- Miter Saw or Miter Box: Achieve perfect 30 and 60-degree angles for your hexagons with a reliable cutting tool for clean, precise joints.
- Wood Glue & Adhesive: Secure your interlocking tiles firmly together and mount them safely to backing material with high-strength wood adhesive.
- Assorted Wood Stains: Create depth and contrast in your cluster by applying different shades of stain to individual scrap wood pieces.
Vertical Slat Accent for Tight Walls
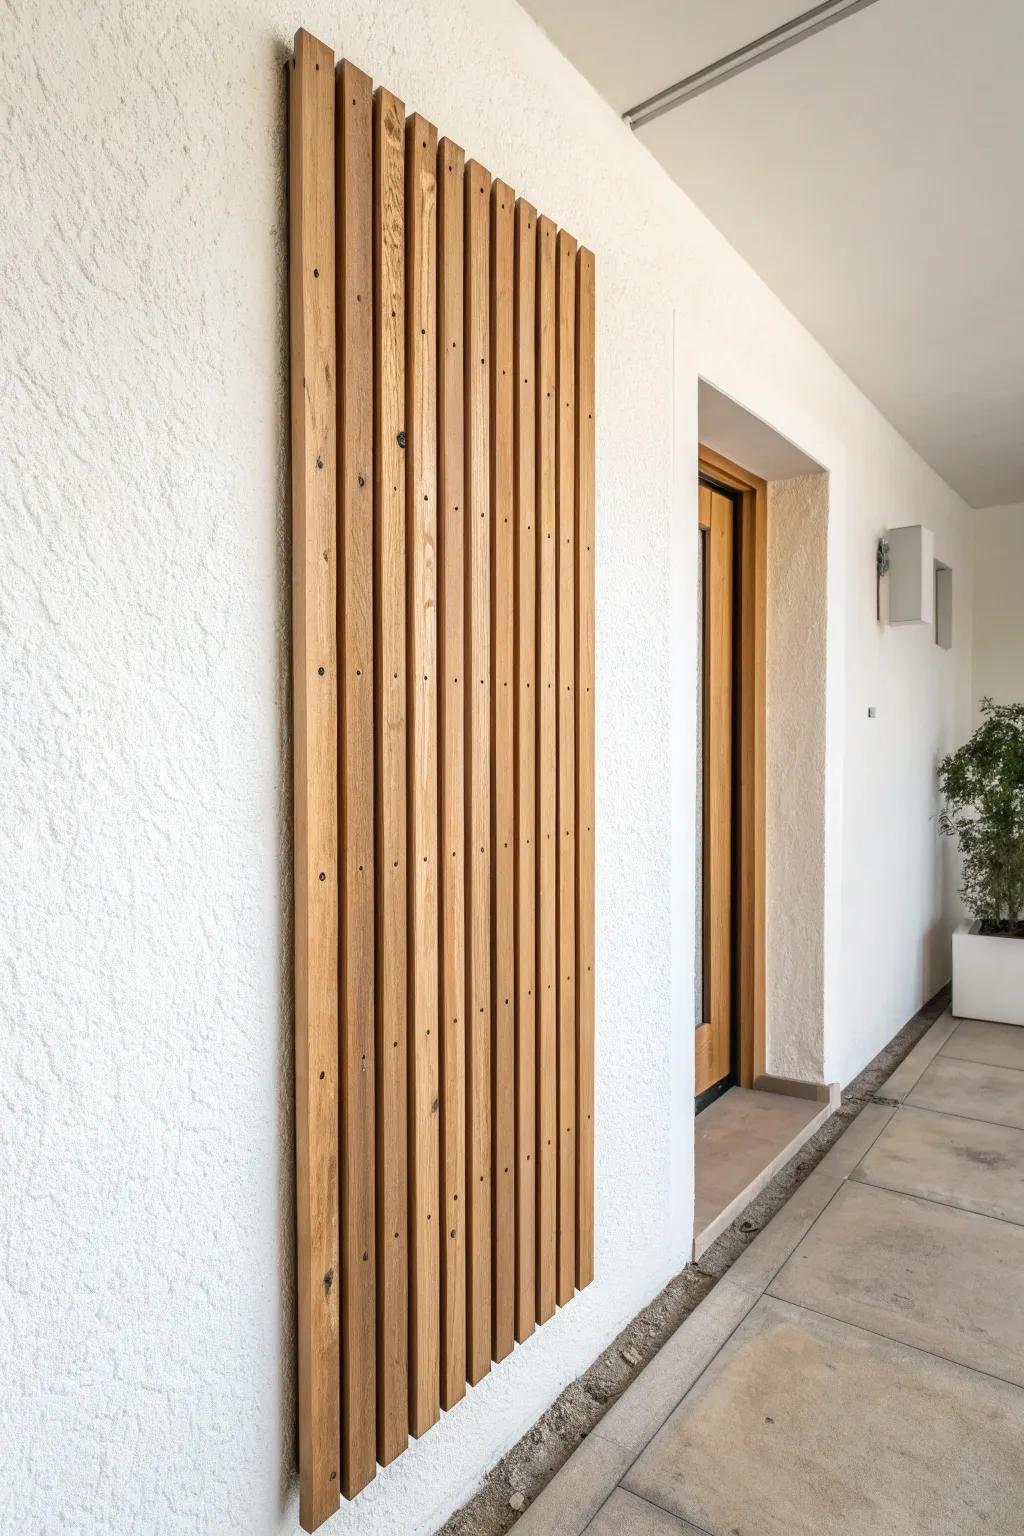
When a wall is awkwardly skinny, I go vertical with evenly spaced scrap wood slats as minimalist wall art. I’ve used this in a tight entry and it instantly made the ceiling feel higher.
Check if these fit your needs:
- Unfinished Wood Slats: Purchase pre-cut lumber slats to create this look instantly without needing to rip larger boards down yourself.
- Clear Outdoor Wood Sealer: Protect your wood art from the elements while enhancing the natural grain with a durable clear coat.
- Exterior Construction Adhesive: Mount your vertical slats securely to stucco or siding surfaces without relying solely on screws or nails.
Reclaimed Shingle Scale Texture
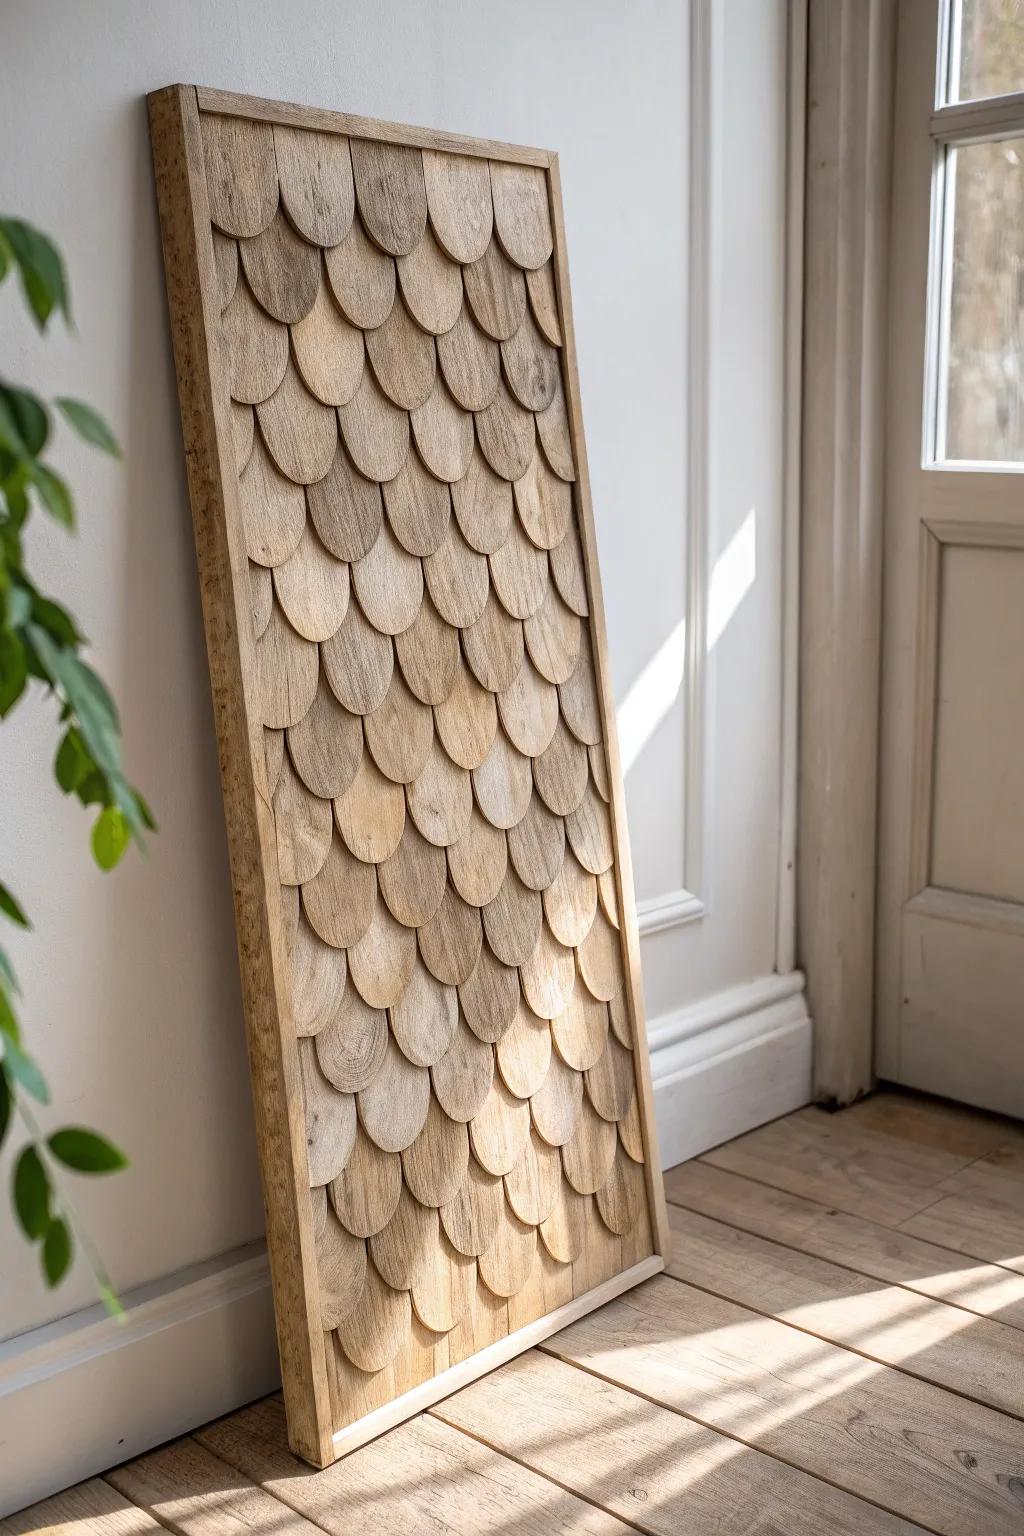
Layer small rounded scraps like “scales” to create a textured wood wall art panel that feels almost like sculpture. I tried this in a plain bathroom area, and the pattern made even basic white walls feel curated.
A few things you might like:
- Thin Wood Craft Sheets or Birch Plywood: Use these versatile thin sheets as your base material to trace and cut out your individual scale shapes.
- Heavy-Duty Wood Construction Adhesive: Ensure your wooden scales stay permanently attached to the backing board with this strong, reliably bonding adhesive.
- Scroll Saw or Coping Saw for Intricate Cuts: Create uniform, rounded scale edges easily by using a saw designed specifically for detailed curved cutting work.
Air Plant Pocket Grid

I’ve carved or glued shallow little pockets into scrap wood wall art so air plants tuck right in. It’s my favorite “living art” trick for small apartments because it adds softness with basically zero maintenance.
Consider these options:
- Assorted Live Air Plants: Fill your new wooden pockets with these low-maintenance tillandsia plants for instant, living greenery on your wall.
- Natural Wood Glue: Securely bond your scrap wood blocks together into a grid pattern using a strong, interior-grade adhesive.
- Jute Hanging Twine: Add a rustic finishing touch and easily mount your new artwork using durable, natural fiber twine.
Hidden Key Hook Landscape Panel
I built a cute scrap wood wall art landscape that secretly has hooks underneath for keys and dog leashes. I love this in small entries because it keeps clutter out of sight while still looking decorative.
A few relevant products:
- Assorted Wood Veneer Sheets: Create beautiful tonal landscapes using these varied wood sheets, perfect for adding depth and color to art.
- Small Magnetic Cabinet Latches: Install these discreet latches to keep your hidden key compartment securely closed yet easy to access daily.
- Wall Mounted Key Hooks: Keep your keys organized underneath or behind your art panel with these sturdy, easy-to-install small metal hooks.
Sound Wave Slat Art
I cut scraps into different lengths and line them up like a sound wave for graphic, modern wood wall art. I made one from leftovers after a shelf project, and it turned my blank wall into a conversation starter.
A few helpful options:
- Construction Adhesive: Secure your wood slats firmly to the backing or wall with a strong, reliable construction adhesive.
- Wood Stain Variety Pack: Create depth and contrast in your wave design by staining slats in different diverse shades.
- Brad Nailer Kit: Speed up assembly and ensure tight joints by pinning slats quickly with an electric brad nailer.
Backlit Constellation Inlay Panel
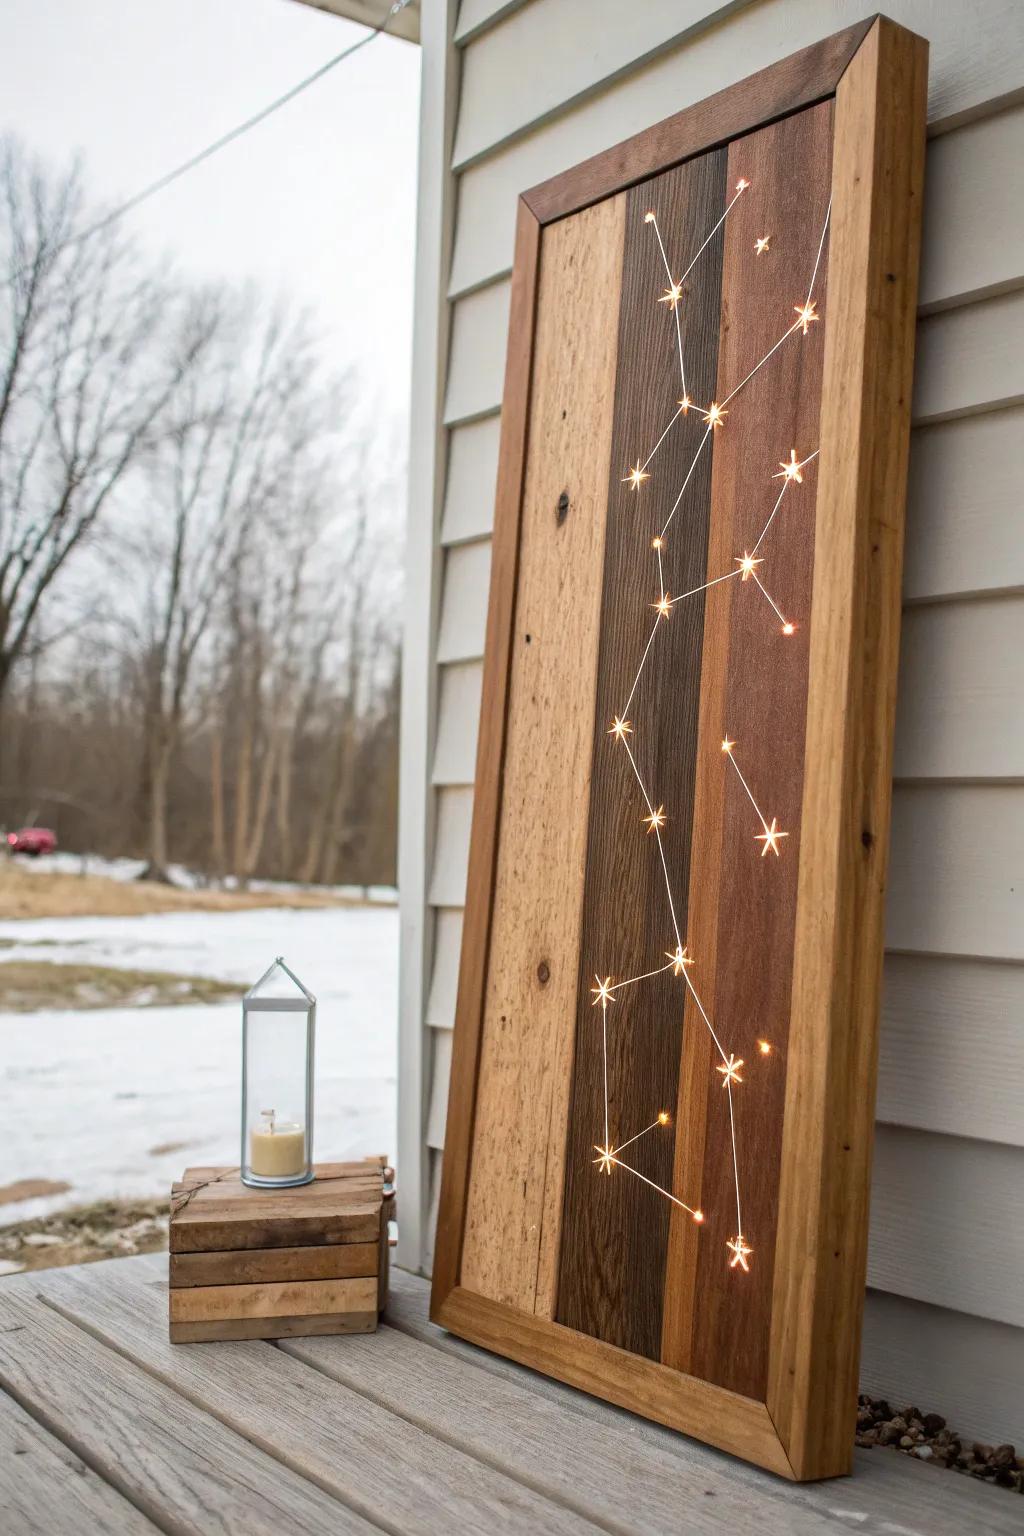
For a real wow moment, I drill tiny “star” holes through a scrap wood panel and hide a small battery light behind it for glowing wall art at night. I’ve used this in a studio sleeping nook, and it doubles as soft lighting without taking up a single inch of tabletop space.
You might give these a try:
- Battery-operated LED String Lights: Choose battery-operated fairy lights to create that magical glow behind your constellation without needing messy power cords.
- Precision Drill Bit Set: Use small, high-quality drill bits to create perfectly clean holes for your stars in various sizes.
- Silver Copper Craft Wire: Connect your wooden stars visually on the front surface using this thin wire for an authentic constellation look.


